
16 Haziran 2012 Cumartesi

34 LOMO'NUN İÇİNDE NE VAR ?
BENCE AÇMAYIN ! "İÇİNDE NE VAR ?" DİYE İÇİNİZ İÇİNİZİ YİYORSA, BUYURUN !
Opening the camera:
Opening the LOMO LC-A Camera
Warning! Disassembling your camera is all at your own risk. It should be done only if you know you have the skills to handle small mechanical parts and if you have the appropriate tools available. Open your camera only if it failed the way described here and if you could exclude all the other possible causes of failure. You should be aware that you risk major damage to the camera’s electronics and mechanic parts, even when using proper tools. The author of this guideline is not responsible for damage to the camera due to performing the shown steps!
This could help repairing the ‘cam does not fire, shutter sticking’ problem with the LOMO LC-A camera in some cases. But there is no guarantee that these steps can solve the problem! It worked with mine but there might be other causes of failure.
Symptoms with my camera:
- when depressing the release I hear only one klick, but the frames stay black, even in bright sunlight
- film is being advanced correctly
- both lights in the viewfinder stay off or go off after depressing release button half the way
- lights can be made going on and off by wiggling the button
- battery check shows that batteries are OK (do not only measure the voltage but try replacement batteries)
- batteries have proper contact, contacts are not oxidized (try scratching with screwdriver/knife, then test function) So what was the cause of this failure? I must admit, I don’t know exactly. When I opened the camera I noticed that the lever of an internal switch was a bit out of place. It was the main power switch. It could have slipped off one time my camera hit the floor. I corrected the position of the switch and since then it works.
Things you need:
- handcraft skills
- watchmaker screwdrivers (one for phillips screws N0.0, one flat – attention – it should fit exactly in order to not damage the screws)
- non-textured, flat floor (you’ll notice the benefit when a screw fell off the table
- small (electronics!) soldering iron (15 watts is enough, 40 is already too much!) – you’d need it only in case you break a wire off the soldering point
- patience
Opening the camera:
Step 1: removing the front cover
The middle front part (lens cover) is held by 4 screws on the left and right side. Should be no problem to remove it.Step 2: removing the top cover
The top part is a bit tricky to remove, for it is held by ‘hidden’ screws. See picture for locations of the screws. At the left front side there is a covered screw just below the second ‘O’ of the word LOMO. You have to peel back the plastic deco to reach it. Two of the screws are located beneath the rewind crank.
- Pull out the rewind wheel and carefully take off the top part. NOTE: the whole thing can not be fully removed as the rewind wheel still holds it. Take care of the light meter dial, for it is attached to the top cover and is somewhat in the way when turning the cover aside.
- Watch out for the release button that comes falling out now. It consists of the upper plastic part and a metal screw-thing that fits into it.
- Turn the cover to the front.There is no need to remove the bottom part but you have a good view on part of the mechanics if you do so. It is held by 3 screws, all are easily found. Open the back door to remove the bottom part. Watch out for the small rubber piece which works as a spring for the battery lid. Remember its position and orientation.Step 4: checking the main power switch function
another photo (40k)
The power-on switch is a brass spring that is operated directly by the mechanism of the release button. It has two contacts, where the ‘down’ position means ‘on’ and up is ‘off’. The upper contact is not connected, which means that the camera only pulls current when the button is pressed.
- Watch the black lever that operates it. The small dome should line up with the middle spring of the switch, pushing it upwards in normal position. When you press the lever down, the switch must be in contact with the lower spring.
- Turn the switch into place if there is need to (carefully!).
- Check function. Cover the light meter resistor (the cylinder-shaped thing on the right) to let both lights go on.One more source of failure could be the contact slides located on the inside below the power switch. Unfortunately, there is no chance to reach them unless you disassemble the whole machine. But this is only for real experts! Stop disassembling at this point! There is nothing more that you can do and there is high risk to not to be able to reassemble the cam.Step 5: reassembling
Everything in reversed order. Take care about the wires, do not jam them. Don’t forget to insert the release button (both parts!) and the battery-lid rubber.
The plastic finishing does not need to be glued back on, for it is held by the front cover.
The lens lids must be exactly in place to work correctly. Test function prior to inserting the screws.


31 KLASİK LC-A KULLANMA KILAVUZU
SONRA "BEN BİLMİYORDUM" DEMEYİN !
LOMO LC-A MANUAL TRANSLATION
1. PREFACE
| ||||||||
LC-A (LOMO COMPACT-AUTOMAT) is a miniature scale camera with telescopic viewfinder and automatic program exposure working. The camera operates in temperature range from minus 15 to +45?C, direct solar radiation and precipitation excluded.
The camera is powered from a d.c. source, type SR-44P (CUO.l8-Y2), S-76. Note. When using another power source with temperature operation range lower than that of your camera, the camera temperature operation range is to be limited with that of the power source. Camera LC-A has some distinctive features. It is so small that you can carry it in your pocket or in a handbag. Automatic exposure working is ensured in a wide range of object brightness. The camera is provided with a device protecting the photo objective and viewfinder objective from mechanical damages and contaminations in storage. The camera is provided with electromechanical program shutter controlled with electronic exposure meter ensuring automatic working of exposures. Camera viewfinder is telescopic. A luminous picture limiting frame with a parallax mark for taking at near distances, a light indicator for control over power cells energetic level, a light indicator warning of expected shutter speeds longer than 1/30 s are in the field of vision of the viewfinder. A wide-angle high power objective <Minitar 1> is rigidly built in the Camera which considerably extends opportunities of the camera (photographing of architectural subjects and landscapes at short distances, photographing of landscapes in small premises and so on). In this case, some vignetting (decrease of brightness and definition towards the margin of the field) is possible. Focusing is carried out by the distance scale and by symbols visible in the viewfinder field of vision. For photographing with a flash bulb, a manual diaphragm setting in the range of 2.8 to 16 is provided. At switching-over from automatic operation (A) to manual diaphragm setting, a shutter speed 1.60 s is set. Contact X is used for synchronization of the shutter with the flash bulb. Film advance and shutter cocking are carried out simultaneously by means of a hand wheel with 360? rotation angle. Frame counter counts number of frames taken, and it is set to initial position automatically as soon as the camera back is opened. Rewind crank is of a tape-measure type. For rewinding, film advance gear disengagement knob is to be fixed in the depressed position. Provision is made in the camera for a special motor attachment for automatic film transport. | ||||||||
2. SPECIFICATIONS
| ||||||||
Film accepted. mm . . . . 35
Frame size. mm . . . . . . 24X36
Number of frames . . . . . 36
Photographic objective <Minitar 1>:
Electromechanical program shutter is controlled with electronic exposure meter.
Shutter speeds, s . . . . . . . . . . . . from 1/500 to 2 minutes
Operation range of exposure meter with 100 ISO film light sensitivity, cd/m? . . . . . . . . . . . . from 0.6 to 19000
Range of film light sensitivity, ISO . . . . . . . from 25 to 400
Telescopic shutter with luminous picture-limiting frame with parallax mark for taking at a distance of 0.8 m.
X-type synchronization with flash bulb.
Shutter speed for taking with the flash bulb, s . . . 1/60
Tripod socket thread . . . . . . . . . . . . 1/4″
Overall dimensions, mm, not over . . . . . . . 107 x 68 x 43.5
Mass, kg, not over . . . . . . . . . . . . 0.25
| ||||||||
3. DELIVERY SET
| ||||||||
3.1. Camera LC-A . . . . . . . . . . . . . . . . . 1
3.2. Hand strap . . . . . . . . . . . . . . . . . 1
3.4. Operation manual . . . . . . . . . . . . . . . .1
3.5. Box . . . . . . . . . . . . . . . . . . . . 1
| ||||||||
4. DESIGN
| ||||||||
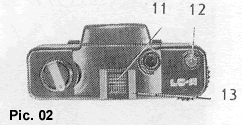
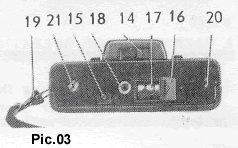
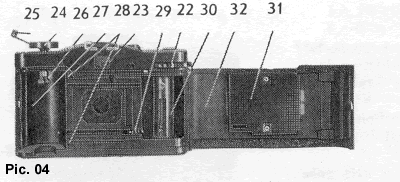
Camera parts and main controls are given In Pic. 1-4.
1. guard cover
2. guard curtains 3. photographic objective 4. light-limiting device of photo detector 5. viewfinder 6. film light sensitivity setting knob 7. film light sensitivity window 8. objective focusing key 9. manual diaphragm setting and operation modes key 10. release knob 11. decorative plug 12. frame counter window 13. flash bulb joint 14. guard curtains control key 15. film advance gear disengagement knob 16. cells container cover 17. cells container 18. tripod socket 19. shoulder strap 20. motor attachment connector 21. take-up spoof shaft output 22. shutter cocking and film feed lever 23. viewfinder inspection window 24. rewind hand wheel 25. rewind knob 26. rewind hand wheel axle yoke 27. cassette receptacle 28. film position limiters 29. film advance gear 30. take-up spool 31. pressure plate 32. camera back | 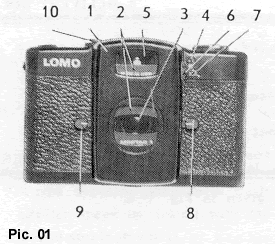 | |||||||
 | ||||||||
 | ||||||||
 | ||||||||
5. PREPARING FOR OPERATION
| ||||||||
5.1. Installing and Checking the Cells
| ||||||||
To install the power source into the camera, move cover 16 (Pic. 03) In a direction pointed with an arrow. Put the cells into the container so that sign <+> on the cells is looking towards sign <+>. on the camera container. Close the container cover. Watch attentively over correct setting of the cells.
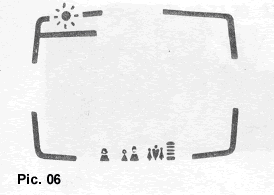
The cells installed, check them for serviceability. For this aim, move curtains control key 14 so as is shown in Fig. 6. Open the viewfinder. Looking through the inspection window 23 (Pic. 04). press down the release knob 10 (Pic. 01) until it is stopped slightly. If the cells are serviceable and inserted in a correct way, a red-color indicator should shine at the upper left corner of the viewfinder (Pic. 06). If the indicator doesn’t shine, check up whether the cells are inserted in a correct way and contact areas are clean. If the indicator doesn’t yet shine, replace all the cells. To check up energetic level of power cells in the course of taking, press down the release knob. If, with release knob pressed, the indicator doesn’t shine, stop taking and replace the power cells. | 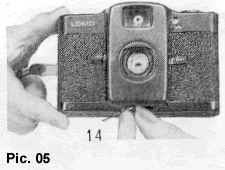 | |||||||
 | ||||||||
5.2. Camera Loading
| ||||||||
Camera LC-A is rated for 35-mm perforated film loaded in a standard cassette.
To insert the cassette with film into the camera, swing out knob 25 (Pic. 04) of hand wheel 24 and pulling it upward as far as it goes open the camera back 32. Put the cassette into receptacle 27 so that a film leader is facing to the right. Lower hand wheel 24 so that yoke 26 enters the cassette spool lug. Put the film leader (Pic. 07) into the slot of the take-up spool so that film perforation engages into mesh with a tooth of take-up spool 30 (Pic. 04). Holding the cassette with film with your hand and rotating hand wheel 22 with the other hand, take up film slack. Make sure the film is positioned between limiters 28, that it is engaged with gear 29 and is fixed reliably at take-up spool 30. If hand wheel 22 has turned up to stop while the film slack has not yet taken up, press down release knob 10 (Pic. 01) and continue taking up the slack. ATTENTION! If the objective and view-finder are covered with the guard curtains, release knob 10 is interlocked. Never press the release knob when the guard curtains are shut. To unlock it, apply key 14 (Pic. 03) to open protective curtains of the taking objective. After the slack is taken up, close camera back 32 (Pic. 04) and press it tightly to the body so that the back is fixed. Turn hand wheel 22 (Pic. 08) up to stop and press the release knob. Repeat the procedure twice or thrice till digit <1> appears in the frame counter window against the index. While pulling the film, watch rewind hand wheel 24 (Pic. 04). If the camera is loaded with the film correctly, hand wheel 24 should rotate at rotation of hand wheel 22. | 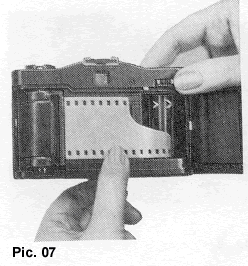 | |||||||
 | ||||||||
5.3. Setting Value of Film Light Sensitivity
| ||||||||
After installing the cassette with film into the camera, it is required to introduce into the exposure meter a value of light sensitivity of film applied (the value given on the packing). For this aim rotate film light sensitivity setting knob 6 (Pic. 01) till a value required appears In window 7 as is shown in Pic. 09. For subsequent operation, loading the camera with a new film, it is required to introduce a new value of light sensitivity.
The light sensitivity scale in the camera has numberings 25, 50, 100, 200, 400 ISO. If there is no light sensitivity value of your film on the scale, set the value making use of Table 1. Exact correlations of light sensitivity values are given in thick print in the Table. | 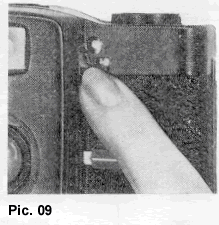 | |||||||
|
5.4. Focusing and Framing
| ||||||||
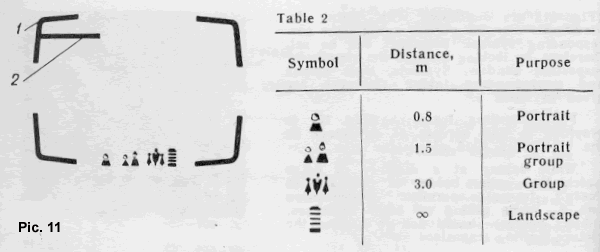
Objective in the LC-A camera can be focused by distance scale and by symbols visible in the viewfinder.
To focus by distance scale, estimate camera-to-object distance and bring key 8 (Pic. 01) to corresponding position with respect to distance scale 33 as Is shown in Pic. 10. Positions of key 8 (Pic. 01) with respect to distance scale 33 (Pic. 10) are duplicated with setting the viewfinder movable pointer against the corresponding symbol. Distances can be set, therefore, by looking through the viewfinder inspection window. Symbols, their values and corresponding taking distances are given in Table 2. Picture-limiting frame 1 (Pic. 11) Is provided to find borders of an image in the viewfinder field of vision. While taking at a distance of 0.8 m watch that upper border of your subject doesn’t trespass parallax compensation line 2. While taking at other distances, subject borders should not go beyond the picture-limiting frame. | 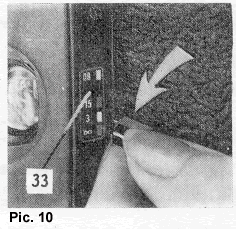 | |||||||
 | ||||||||
6. TAKING
| ||||||||
6.1. Automatic Taking
| ||||||||
Before taking, draw apart curtains 2 (Pic. 01) covering objective 3 and viewfinder 5.
Bring diaphragm setting key 9 to position <A>. Look at window 7 to check up whether film sensitivity value is set correctly. Cock up the shutter with complete revolution of hand wheel 22 (Pic. 04). Check up for serviceability of the power source slightly pressing down release knob 10 (Pic. 01) and watching the indicator in viewfinder inspection window 23. Focus the objective and find subject borders by means of the picture-limiting frame. Check to see that you have not shut with your fingers light-limiting device 4 and objective 3. Press release knob 10 up to stop. Release the knob only after shutter responding. | ||||||||
6.2. Taking with a Flash Bulb
| ||||||||
With slight depressing of the release knob, you can see in the viewfinder a red-color indicator at the upper right corner simultaneously with the red-color indicator at the upper left corner. Its luminescence is a witness of an exposure time longer than 1/30s.
In this case, in order to avoid somewhat blurred image on the film, it is necessary to ensure steadiness of the camera, i.e. to carry out taking from a support, from a tripod or to apply a flash bulb. Camera design is rated for application of the flash bulb with cableless connection. Operation mode of the camera with the flash bulb differs from automatic operation only in determination of diaphragm value and input of this data into the camera mechanism. Shutter speed of 1/60s is set automatically when diaphragm values from 2.8 to 16 are set. To determine diaphragm value, divide the flash bulb guide number by an object distance value in meters. A result obtained is the diaphragm value required for taking with the flash bulb. Put key 9 (Pic. 01) against the calculated diaphragm value as is shown in Pic. 12, and bring key 8 (Pic. 01) to a corresponding position with respect to distance scale as is shown in Pic. 10. The camera Is ready for taking | 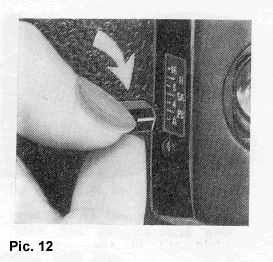 | |||||||
7. FRAME COUNTER
| ||||||||
The frame counter operates on the addition principle and shows number of frames taken. It is advisable to take a first picture when counter digit <1> is against the index. Numbers <l2>, <24>, <36> and the initial point on the frame counter scale are marked yellow.
With the camera back open, the frame counter is set to initial position automatically | 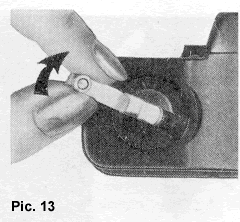 | |||||||
8. FILM ADVANCE AND TAKING OUT
| ||||||||
Cocking of the shutter and advance of the film are carried out in the camera simultaneously, with complete revolution of hand wheel 22 (Pic. 04). Sometimes, however, the complete revolution of hand wheel 22 is impossible because the film end is lacking for a full frame.
Don’t force the hand wheel in this case, otherwise the film can break loose from the spool core. Press the film advance gear disengagement knob 15 (Pic. 03). Hinge away knob 25 (Pic. 04) and turn it in a direction pointed with the arrow (Pic. 13). Rewind over, you will feel a slight jerk of the film and an easier run of hand wheel 24 (Pic. 04). Pull hand wheel 24 upwards taking hold on knob 25. At the end of hand wheel run, when the camera back is opened, take out the cassette with the film. Now the camera is ready for subsequent loading with film. | ||||||||
9. OPERATION INSTRUCTIONS
| ||||||||
Don’t allow heating of your camera, never leave it in the sun, on the hot sand etc. as it can cause damage of the film, power source or electronic system and lead thus to a wrong exposure.
Pay attention to cleanness of lenses as their contamination deteriorates quality of film image. The objective and viewfinder can be wiped on the outside only with a clean cambric or linen napkin, on breathing on glasses. Protect the camera against shocks and jerks, in order to avoid damage of precise mechanical and electronic systems. Never disassemble the camera. Only skilled experts of repair shops can allow curing troubles, if any, in your camera. For long-term storage, the shutter should not be cocked. Take power source cells out of their container, also. Move the guard curtains key to a position at which the curtains shut the objective and viewfinder. Never wipe non-metal parts of your camera with alcohol, acetone, petrol and other active solvents. Protect the camera against humidity and dust. | ||||||||


14 Haziran 2012 Perşembe


11 Haziran 2012 Pazartesi
28 LOMO DAHA FAZLA BİLGİ
ÖNCEKİ SAYFA RUSÇAYDI. BU DA İNGİLİZCESİ.


BİRAZ DA TARİHİNE BAKALIM MI ?
| LOMO MILESTONES (NON-DEFENSE PRODUCTS) | |
 | 1914 Company opens for business under the name Russian Optical and Mechanical Company |
| 1914 — 1917 Company develops first optical devices for the Russian Army: stereo tubes, panoramic sights, sights for field guns, etc. | |
| 1918 Company releases the first geodesic devices. | |
| 1930 Company produces the first Russian photo camera. | |
| 1933 Company introduces its first movie camera. | |
| 1934 Company produces its first stilloscope and microscope. | |
 | 1936 Company develops its first special astronomical device allowing the observation of movements of celestial objects in eclipse. |
| 1937 Company produces equipment for the St. Petersburg Planetarium. | |
| 1939 Company introduces its first student and biological microscopes. as well as its first manual movie camera | |
| 1947 Company produces the first astrograph for the world renowned Pulkov Observatory. | |
| 1948 Company develops the first photoheliograph employing a special optical Maksutov scheme, which allows a decrease in the length of the device by half. | |
 | 1950 LOMO introduces its first microscope for researching objects under UV light. |
| 1951 LOMO develops its first interferometer for checking of rough surfaces. | |
| 1953 LOMO introduces its first microscope for precise measurements in nuclear photo-emulsions. | |
| 1956 LOMO produces its first wide-screen-format movie projector and introduces its first fluorescent microscope for chemical structure analysis. | |
| 1957 LOMO develops its first distance microscope for “hot” laboratories (radioactive materials analysis). LOMO’s microscopes win a Grand Prize and a Gold Medal at the World's Fair in Brussels. | |
| 1960 LOMO produces Europe’s largest telescope, with a main mirror diameter of 2.6 meters (8.5 feet). Company develops its first infrared microscope for research with wave-lengths less then 0.0000012 meters. | |
 | 1963 LOMO introduces its first biological research inverted microscope for virusology and oncology. |
| 1966 LOMO introduces its first laser device for scientific research. | |
| 1968 LOMO develops its first contact fluorescent microscope for examining live human tissue. | |
| 1972 LOMO introduces new unified families of biological and inverted microscopes. | |
| 1976 LOMO manufactures the world’s largest telescope, with a main mirror diameter of 6 meters (20 feet). Company develops the first laser device for surgery of oncology-related illnesses. | |
| 1977 LOMO produces telescopes for research of astronomical objects using methods of spectrography, spectrometry and photometry. Company comes out with its first spectrophotometer controlled by a microcomputer. LOMO introduces its first series of endoscopes. | |
| 1982 LOMO introduces a surgical ophthalmologic microscope with fiber-optical coaxial lighting. | |
| 1983 LOMO releases its unique photo camera, the "LOMO-compact." Also, Company introduces the first laser device for thermonuclear synthesis. | |
 | 1988 LOMO develops the laser automatic interferometer – optical mechanical products allowing precise measurements of optical parameters with tolerances of 0.0000001 meter. |
| 1993 LOMO introduces its first submergible endoscope. | |
| 1994 LOMO releases the infrared analyzer for determination of quality of grain. Company introduces its first consumer night vision scope. | |
| 1996 LOMO introduces the first consumer day/night vision scope. Company develops its first hermetically sealed endoscope for medical research of intestines and kidneys. | |
 | 1997 LOMO introduces the series of safe-for-the-eye lasers for medicine (ophthalmology and neurosurgery), measurement, and ship navigation systems. LOMO America, Inc. is incorporated as an independent company – the exclusive master-distributor for all LOMO products in the USA, Canada and Mexico. |
| 1998 LOMO develops its first automated spectrophotometer with registration system on multi-element photo adapter. | |
| 1999 LOMO introduces its new family of biological, fluorescent, and polarizing microscopes. LOMO develops its family of consumer Maksutov telescopes from 30 mm to 203 mm in diameter. | |
27 LOMO ST. PETERSBURG
LOMO'NUN L'Sİ "LENİNGRAD"DAN GELİYOR.
BELKİ FABRİKANIN BUGÜNKÜ DURUMUNU GÖRMEK İSTERSİNİZ. KORKMAYIN. SİZİ BİR TRAJEDİ BEKLEMİYOR. HER ŞEY YOLUNDA. BU ARADA SİZİN ELİNİZDEKİ LOMOLAR BU FABRİKADA ÜRETİLMİYOR. HER ŞEY GİBİ O DA ÇİN'DE YAPILIYOR ARTIK.
 |
| LOMO FABRİKASINI GEZ |
8 Haziran 2012 Cuma
.jpg)
.jpg)
25 SİYAH BEYAZ PRAG 7
1990 PRAG. GÜZEL ŞEYLER NEDEN ÇABUK BİTER ? 2
SON SAATLER PRAG'DA

+LOMOFOTO18.jpg)
SON SAATLER PRAG'DA

TUREK KAWA- TÜRK KAHVESİ İÇİLMEZ Mİ ŞİMDİ ?
+LOMOFOTO18.jpg)
BERLİN YOLCUSU KALMASIN. SENİ SEVİYORUM PRAG
24 SİYAH BEYAZ PRAG 6
PRAG 1990. GÜZEL ŞEYLER NEDEN ÇABUK BİTER ? 1


GEZ GEZ BİTMEZ

SANAT YERİ YER SANATI

ÖZGÜRLÜK HER YERDE


22 SİYAH BEYAZ PRAG 4
1990 PRAG. LOMO ELİMDE. UMRUMDA MI DÜNYA ?
+LOMOFOTO20.jpg)
+LOMOFOTO13.jpg)

+LOMOFOTO20.jpg)
CANLI SOKAK
+LOMOFOTO13.jpg)
BU NE GÜZELLİK

GÜZELLİK Mİ BİTER PRAG'DA ?
Kaydol:
Kayıtlar (Atom)